
The Mac OS X version of SharedAppVnc incorporates two pieces of software, a server and client. The server, which allows windows to be shared, is a Cocoa application called SharedAppVnc.app. It can be started by double-clicking on the SharedAppVnc icon from Finder. The viewer is a java application called sharedAppViewer which can be started from the SharedAppVnc dialog box or invoked from the command line. The viewer receives and displays shared windows from remote servers.
Screenshot of the sharedAppVnc application (lower-right corner) being used to share windows.

Start the server by clicking on the SharedAppVnc icon in the Finder window where the binary was downloaded.
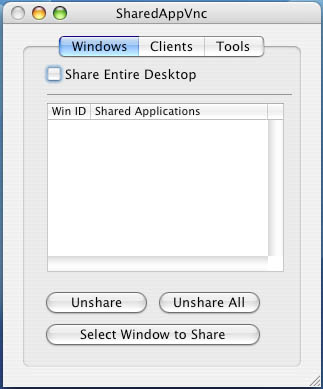
It will open the dialog window interface. The dialog window has three tabs:
- "Windows" for managing which windows are shared.
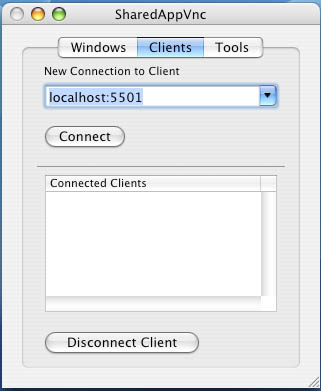
- "Clients" for establishing connections to remote viewer clients.
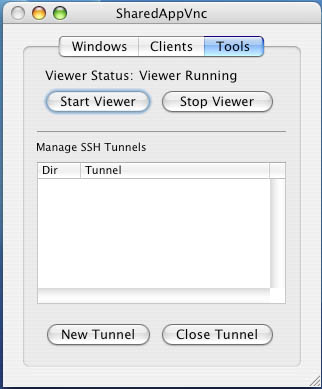
- "Tools" for starting the viewer process and setting up ssh tunnels.
 |
 |
 |
Viewer:
By default a Viewer process is also started when the SharedAppVnc application is opened. This allows for recieving shared windows as well as sending shared windows. From the "Tools" tab of the dialog box the viewer process can be started or stopped. By default is listens for connections on port 5500.
The viewer can also be started as a command line process. See SharedAppVnc Linux instructions for details.
Typically the server initiates a connection to the client. This can be done through the SharedAppVnc "Clients" tab in the dialog window. Enter the client you want to connect to such as "viewerhost:5500". The default port for the viewer client is 5500. After clicking "Connect" the client will show up in the "connected clients" list box if the connection was successful.
Connect to remote host:
|
|
|
|
Enter host:port and click "Connect" |
The connected host appears in the listbox |
Disconnect from remote host:
To disconnect from a client, select that client from the list box and click "Disconnect Client".
|
|
|
Disconnecting from the remote viewer |
When a client is behind a firewall, it is not possible to establish a direct connection. In this case it is necessary to set up a secure tunnel that will forward traffic intended for the client through the firewall. Such a connection can be made using SSH tunnels. To setup an SSH tunnel it is necessary to use a third computer (a portal) which both users have access to.
If you have a user account on the portal computer, you can log onto the portal and reserve a port that will be used to direct network connections through the firewall and to a specified port on the client computer. There is a dialog window in SharedAppVnc that can help you set up this SSH Tunnel.
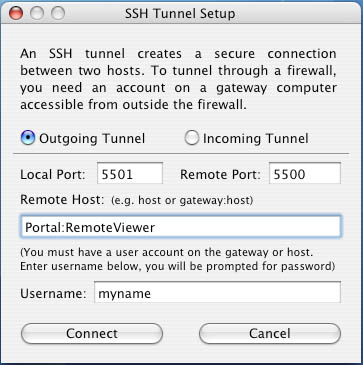
To establish the SSH Tunnel, click on "New Tunnel" from the "Tools" dialog pane. This will open a new SSH Tunnel dialog window. Select "Outgoing Tunnel" and enter a local and remote port. The remote port needs to be 5500 because that is the port the viewer client listens on. The local port can be anything, it is just the port you will be redirecting traffic through on the portal computer (in our example we'll choose 5501). Then enter the pathway to the remote computer. If the portal computer is named "Portal" and the client computer is "RemoteViewer", then we would enter "Portal:RemoteViewer". Then enter your user name on the portal computer and click "connect". A dialog window will open asking for your password on the portal computer. After successfully authenticating and connecting, you will see your tunnel added to the list box on the "Tools" dialog pane. Note that the "RemoteViewer" client has to allow incoming connections to port 5500 (i.e. it's local firewall rules must allow this traffic in).
Once the SSH tunnel is established, you will have a redirection path that
goes from
localhost:5501-->portal:5501-->remotehost:5500
When you now establish a connection to localhost:5501, that connection will be
redirected to the remote client. The connection can be established as shown
below.

From the "Windows" tab you can share or hide windows. To share a window, click on the "Select Window to Share" button and then move your mouse over the window to be shared and click on it. The first mouse click after pushing the "Select Window to Share" button will register which window is selected. Note: If the computer is running multiple monitors, only windows from the primary monitor can be selected.
Sharing a window:
|
|
|
| Click "Select Window to Share" and then click on an application window. | The name of the chosen shared application will appear in the listbox. |
Un-Sharing a window:
To hide a window, select the window from the listbox and then click the "Unshare" button. To hide all shared windows simply click "Unshare All".
|
|
|
To hide a window, select the window name from the listbox and click "Unshare". |
Share the entire desktop:
Check the "Share Entire Desktop" box to share your desktop. The share/unshare listbox and buttons will be grayed. To return to window sharing, uncheck the "Share Entire Desktop" box.
|
|
|
Check the "Share Entire Desktop" box to share everything. |
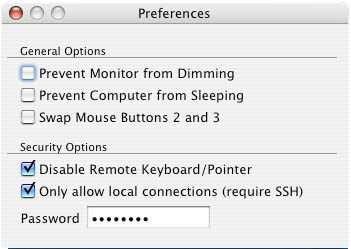
The preferences panel can be accessed from the "SharedAppVnc" menu.
 |
|
This project was developed by Kai Li's research group at Princeton University Computer Science Department and funded by the SciDAC FusionGrid project.
Lead Developer: Grant Wallace ![]()
Please use the Sourceforge "Tracker" functionality to report bugs or requests http://sourceforge.net/projects/shared-app-vnc/